Thursday, December 19, 2013

A Christmas Eve dilemma and a Farewell

Christmas Eve supper is my time to host a gathering for family. This year, 2013, my daughter, her husband and two boys who live nearby and my son visiting from Maryland will be seated at my table.

The menu varies each year, some years more formal than others. I’ve been trying to decide what to serve this year, thinking on the subject since before Thanksgiving. One minute I have it all planned out, the next I come across a great idea on Pinterest or on any one of my favorite food blogs.

On this Thursday before Christmas, I still have not made up my mind. But, I thought perhaps that sharing my ideas with you—putting them all on paper (computer!)—will help me to make decisions.


My daughter suggested making one of the Christmas ham dinners shown on America’s Test Kitchen (aka CooksCountry.com and CooksIllustrated.com). She swears by their perfected recipes and uses them all the time. If you read my previous blog entry, you know about the baking powder biscuits I made for Thanksgiving, also from America’s Test Kitchen. Hmmm, I may make those biscuits for Christmas Eve.

So, there are numerous great ideas for ham and/or Christmas dinners at America’s Test Kithen, but again it would be a matter of making up my mind.

The Pineapple Mustard Glazed Ham on Cook’s Country sounds like it would be just right. A ham, 2 kinds of mustard, canned pineapple and, of course, brown sugar.


A favorite dessert of mine is Tofu Pumpkin Pie. My grandsons like it but I don’t know if anyone else will eat it.


If I make a pie of any kind, which on first thought seems like a lot of work, I’d use the Perfect Pie Crust recipe from The Pioneer Woman. It’s a winner and really easy! I featured it on Step by Step in the Kitchen when I made a Strawberry Heart Pie in April.

Bacon Wrapped Veggie Bundles with Cider Maple Glaze are delicious. I made them last week and have a few ideas for improving them. First, I would buy the fatter asparagus and cut the other veggies to match the thickness. Second, I would include twice the number of vegetables in each bacon-wrap. Third, I would do the initial 20 minutes on a boiler pan with rack so the bacon grease can drip down into the pan (spraying the rack first). Fourth, before adding the Cider Maple Glaze, I’d move them all to another pan lined with parchment paper. And, last, I would turn down the heat a bit… 425-degrees or even 400. Depends on your oven. Adjust the cooking time, too. Prepping everything early in the day makes this recipe even simpler.

I truly love Brussels sprouts and have been sorely tempted by a recipe for Citrus and Pomegranate Brussels Sprouts. A beautiful dish—simple, simple!

You can probably tell that I’m crazy about vegetables. I even found a great vegetable recipe in a mailing from Bed Bath & Beyond… Audrey’s Ginger and Honey Glazed Carrots. Easy and quick to make.

In that same mailing, BB&B featured a recipe for Orange-Ginger Glazed Ham: ham, orange marmalade, Dijon mustard, fresh ginger (I always have some in the freezer), and cranberry, orange or pomegranate juice.

Holiday dinners typically feature potatoes—mashed, of course. James and Everett’s Colcannon caught my eye. Serious consideration underway.

On the other hand, I may just make plain mashed potatoes… Russets, milk, butter, salt and pepper. On Rachel Ray’s television show recently, she suggested leaving them in the pan, lid on, after mashing and mixing. Place it in a larger pan with simmering water to keep hot for up to several hours.

Back in October I made note of Chicago John’s Blueberry Lemon Slice recipe served with or without a Lemon Cream & Limoncello Syrup. This one is a strong front-runner since everyone in the family likes lemon bars.

My son appreciates a salad with his meals, so that could be a simple add.. mixed greens, dried cranberries and feta cheese with ???? dressing. Oh, dear, another decision. What kind of dressing would go best with these ingredients?

There you have it, my dilemma. As I thought, however, going back through these recipes and seeing them side by side has helped me narrow down my choices. I hope that you are all able to make easy decisions about your holiday meals.


A FAREWELL…


After two years of writing Step by Step in the Kitchen, I’ve decided it’s time for changes in my life. This is my last post on this blog, but I will keep it up on the Internet so you can check back and reread the entries.

Thanks to all of you who have followed me, and to my favorite blogger friends, I’ll still be following your blogs and commenting to stay in touch.


Merry Christmas to all my readers. And a Happy New Year!


******


My other blog is CORNING NY STEP BY STEP -- a view of the city where I live.

CORNING NY STEP BY STEP is now on Facebook. LIKE it and you’ll see when I post a new entry to that blog, plus there will be extra photos of people, places and things of Corning that didn’t make it into the blog.

Tuesday, December 10, 2013

Quick and Easy Cream Biscuits (Baking Powder Biscuits)

Thanksgiving is a distant memory and Christmas is looming on the horizon. My, doesn’t that sound fine (and a bit trite). Before we get too close to Christmas, let’s back up and take one more look at Thanksgiving. The recipe I used for that holiday dinner can be pulled out and used again for Christmas, Easter and any other day of the year, holiday or not!

Here’s how Thanksgiving 2013 went in my family. My daughter held the dinner at her country home.

*Her husband roasted the turkey using a recipe in which it’s covered with strips of salt pork.

*My son made the stuffing in a pan.

*My daughter made two apple pies and a pumpkins pie.

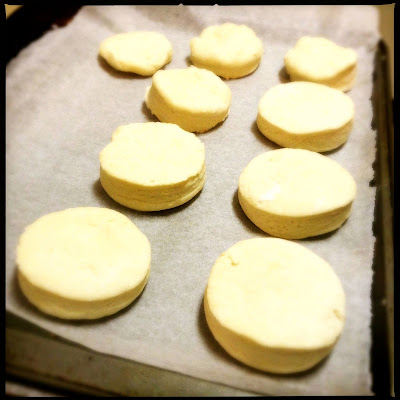
*I made QUICK AND EASY CREAM BISCUITS (baking powder biscuits using heavy cream in place of butter or shortening).

The secret to our successes? We used recipes from Americas Test Kitchen, Cooks Country and Cooks Illustrated (all part of Christopher Kimball’s “kingdom”).

The biscuits were my choice after browsing through numerous menu ideas and recipes. It was an Aha! moment when I came across this recipe ‘cause I’ve always loved to make baking powder biscuits and am quite good at it, if I do say so myself.

What I really like about Christopher Kimball’s sites is that most recipes have a video to go with the printed version. Seeing it done, step by step, makes it much easier for me. I did discover, however, that there was a slight variation in some of the quantities between the two sources. I chose to stay with the amounts in the written version.


QUICK AND EASY CREAM BISCUITS

(makes eight 2 ½-inch biscuits)

Ingredients…

2 cups unbleached all-purpose flour, plus extra for the counter
2 teaspoons granulated sugar
2 teaspoons baking powder
1/2-teaspoon table salt
1-1/2 cups heavy cream*


Instructions…

1. Adjust oven rack to upper-middle position and heat oven to 450 degrees. Line baking sheet with parchment paper.

2. Whisk together flour, sugar, baking powder and salt in medium bowl. Stir in the cream (*see note) with a wooden spoon until dough forms, about 30 seconds. Turn the dough out onto a lightly floured counter and gather into a ball. Knead the dough briefly until smooth, about 30 seconds.


3. Shape the dough into a 3/4-inch THICK circle. Cut biscuits into rounds (I used a 2-1/2-inch diameter round cookie cutter) or wedges. Place on parchment-lined baking sheet. (The baking sheet can be wrapped in plastic wrap and refrigerated for up to 2 hours.) Bake until golden brown, about 15 minutes, rotating baking sheet halfway through baking.

(*add most, then more if needed; may need all, or not—consult Cooks Illustrated video for specifics)


My notes (or, What worked for me)…

1. My original plan was to multiply everything X4 and make one big batch. Then I decided follow the original recipe as a test. After all, conditions and equipment in my kitchen won’t be the exact same as in the Cooks Illustrated kithen.

2. First batch went smoothly, but when baked, the biscuits rose so high that they “fell over”. See the middle biscuit in the picture below? Imagine if it was even higher and fell completely over, in an upside-down, fat U-shape.


3. One batch at a time is just enough to mix. Any more and it would wear out my hand.

4. If you ever made bread, you know you don’t beat on it, but you don’t have to be “gentle”. You can be a little forceful with these biscuits. Too light a hand when kneading and they won’t rise to meet your expectations.

5. On my first try, I used an 8-inch round cake pan as recommended. I pat out the dough in the pan then turned it upside down to remove the dough, before cutting shapes. Because of the high-rising results, I decided to use a 9-inch pan on future batches and that seemed to work much better.


6. After changing to a 9-inch pan, I also lowered the oven heat to 425-degrees. Every oven is different, so it’s worth experimenting to find what works for you. Look for a golden finish, and then take one out of the oven to pull apart and test for doneness.


By the time I’d completed my third batch—and tasted all the “rejects” (leftover pieces)—I was well satisfied that this recipe was a winner!

Slather on a pat of butter. Add jelly or jam. I topped mine with a spoonful of Bammer's Jammers which was featured in my last post.


Probably my favorite way to eat baking powder biscuits is the next morning for breakfast, warmed up and topped with butter and maple syrup. No, there’s no photo. I ate them before I thought of it!


******


My other blog is CORNING NY STEP BY STEP -- a view of the city where I live.

CORNING NY STEP BY STEP is now on Facebook. LIKE it and you’ll see when I post a new entry to that blog, plus there will be extra photos of people, places and things of Corning that didn’t make it into the blog.

Sunday, November 24, 2013

Ice Cream with Homemade Magic Shell and Bammer's Jammers

You must click on these photos and get a close-up look at ice cream with homemade magic shell and Bammer's Jammers!

It all started when I saw photos and a recipe for Bammer’s Jammers on Bam’s Kitchen. BAM is one of my favorite food bloggers and she's good at it, carefully researching every recipe and testing them on her husband and teenage boys.

I knew I had to have it! Who (not me!) can resist a simple mixture of strawberries, cranberries, freshly grated ginger and honey?

Hmm, English muffins and peanut butter came quickly and persistently to mind.


A week later I finally remembered to pick up frozen strawberries at the supermarket. At the moment I’m typing this sentence (2:20 PM ET), the temperature has finally crept up to 24-degreesF. A delightful, sunny BRRR…. so no fresh, local strawberries this month.

Strawberries in hand, I quickly whipped up Bammer’s Jammers and fell in love after one taste straight from the pan. And, I was right. A perfect fit with an English muffin and peanut butter.

The first photo was ordinary and I wanted something with zing. That’s why the jar is tipped over and Bammer’s Jammers is swiftly running out of the jar. Quick, click!!


A few days later, it occurred to me that Bammer’s Jammers would taste good on a bowl of vanilla ice cream. Chocolate flashed through my mind, too. That’s how I came to search out a recipe for Homemade Magic Shell. I’ve made homemade magic shell before, but none of the recipes I tried inspired me to make it a second time.


This time, however, I’m totally sold and this recipe for Homemade Magic Shell from Instructables is a forever-keeper. Here’s why:
1. It’s made with coconut oil.
2. It only has two ingredients (for the basic recipe).
3. It hardens beautifully upon making contact with the ice cream.

Vanilla ice cream, Homemade Magic Shell and Bammer’s Jammers. “Nothing could be finer…”


My other blog is CORNING NY STEP BY STEP -- a view of the city where I live.

CORNING NY STEP BY STEP is now on Facebook. LIKE it and you’ll see when I post a new entry to that blog, plus there will be extra photos of people, places and things of Corning that didn’t make it into the blog.

Monday, November 11, 2013

All About Apples

Between trips to an apple farm and my daughter’s house, I’ve been well-supplied and haven’t had to spend a cent (for apples!) at the supermarket. Fresh picked apples—mmm! They’re the best.

My daughter and her family bought a house two years ago and started their country life with five HUGE apples trees—several different varieties that have not yet been identified but have distinct differences in taste, sweetness and tartness.

Lots of apples their first year but with the moving in and settling down, apple experimentation was not on the menu. Instead, the boys—my little grands—were paid 50-cents a bucket to pick up the many apples. Really, they had to be picked up; otherwise, a walk/run through the backyard and under the apple trees was more like roller skating, from apple to apple.

Last year, their second year of country life, not a single apple appeared!

And now it’s Year #3 and those trees have broken a record in apple production. They’ve also broken several branches due to the weight of the many, many apples.

Son-in-law built a wooden apple press. They’ve made cider. They’ve made and canned applesauce, apple pie filling and apple butter. They’ve given away apples. Still, I find myself “rolling” through the backyard when I visit and the dog is taking me for a walk.

Back to the apple farm: I brought home Honeycrisp that weighed almost a half pound each and were so-o sweet. I also picked MacIntosh, also sweet but with a bit of tartness. They worked well together.

I selected two recipes and loved both! So, here for your baking and eating pleasure are FRENCH APPLE CAKE and APPLE CREAM CHEESE COFFEE CAKE. (Click on the links to see the recipes and click on each photo to see an enlarged, detailed picture.)


FRENCH APPLE CAKE
from BigOven.com ~ cake crust, apple filling, custard filling, garnish


APPLE CREAM CHEESE COFFEE CAKE

from AllRecipes ~ baked in an angel food cake pan (10-inch tube pan).
Cream cheese and confectionery sugar mixture is spread on the bottom layer of batter and topped with another batter layer. A mixture of walnuts, sugar and cinnamon is sprinkled on top before baking.


For more apple recipes, visit these 2011 and 2012 posts on Step By Step In The Kitchen…

APPLE-RAISIN BARS WITH RED HOT CINNAMON CANDIES

FRESH APPLE YOGURT CAKE


APPLE ALMOND CAKE


******


My other blog is CORNING NY STEP BY STEP -- a view of the city where I live.

CORNING NY STEP BY STEP is now on Facebook. LIKE it and you’ll see when I post a new entry to that blog, plus there will be extra photos of people, places and things of Corning that didn’t make it into the blog.

Thursday, October 10, 2013

Three Easy Meat And Veggie Meals Concocted With Whatever Happens To Be In The House


If I wait too long after creating a dish before blogging about it, it takes even longer to translate my notes about said dish. For instance, the nameless creation pictured next was hastily noted on a small piece of paper as ~

“Leafy Green lettuce, Smokey deli Turkey, Polar..., Grand Cru..., Spinach cooked.”


What it means is ~ I cleaned, dried and laid out individual leaves of Leafy Green Lettuce. Each leaf was topped with a slice of Smoked Deli Turkey, then drizzled with a stream of mild Polar Mango Sauce (easily replaced with any favorite sauce). Grand Cru is a version of Gruyere Cheese that is produced in the United States. A strip of it goes on next and the final ingredient is cooked spinach.

Really quite good and I liked picking the leaves up and eating them with my fingers.


******


Another note I came across, slightly more decipherable ~

“1 T. Scallions - Squirt EVOO, 1/2 c. Canned Beets, 10 stalks Asparagus, 1/4 c. Shredded Carrots, Spaghetti Squash 2 c., 1 T. Parmigiano Reggiano”


Here are the actual steps I took ~ First cooked a small spaghetti squash in the oven. After cooled slightly, cut in half and used a large fork to pull out the innards in spaghetti-like strands. Squirted a small amount of extra virgin olive oil in a medium casserole dish. Filled bottom with a layer of spaghetti squash; topped that with cut-up (leftover) cooked asparagus. Arranged canned beet slices around edges and scattered shredded carrots and small pieces of scallions (green onions) on top. Sprinkled with Parmigiano Reggiano.

Can’t remember whether I heated this one in the oven or in the microwave. Anyway, after it had time to heat, I sprinkled it with more Parmigiano Reggiano. Can never have too much cheese!


******


Lastly, and I’m lacking notes on this one, so will go with my memory and the photo ~


A bed of torn lettuce, topped with bite-sized pieces of cube steak (cooked and seasoned however you like it--I simply used Salt & Pepper), pineapple chunks, sliced cooking onion, shredded carrots (the pineapple, onion and carrots were cooked with the cube steak). To top it all off, Polar Mango Sauce.

Such fun to mix and match whatever is in my refrigerator and cupboards.

Tuesday, September 24, 2013

Breakfast, Brownies and Mini Turkey Loaves

I’ve been so lazy this past month. Have you noticed?! No food posts since August 27, but I continue to cook and eat. Can’t avoid it.

Just for today, some photos of foods I’ve been eating ~ no detailed recipes, only brief descriptions and comments.


BACON, EGG & CHEESE CUPS
This breakfast (or brunch) dish starts with bacon, so why in the world would you need to grease the muffin tin? Because, in spite of the bacon grease, they stick to the muffin tin. Maybe lining each “cup” with parchment paper would work. Start with bacon, sprinkle with shredded cheese, pour in eggs mixed with chopped chives or green onions, salt & pepper. Bake in a preheated 350-degree fahrenheit oven 30-35 minutes until the bacon is crisp and the egg mixture is “set”. If you don’t eat them all, wrapped them carefully and freeze for future consumption!


A HEARTY BREAKFAST
Scrambled eggs, toasted homemade English Muffin Bread, strawberries and what I believe was a slice of Spam.


BROWNIES
I bought a brownie divider pan and just love it. After baking them, I decorated with nuts, chocolate chips and Reese’s PB cups. After they cooled, I simply lifted the divider out and was left with twelve equal sized brownies.


MINI TURKEY AND VEGGIE MEATLOAVES
Yes, it’s the brownie divider pan. It worked on mini turkey loaves, too. Follow the Food Network recipe and each piece (when using this divider pan) is about 125 calories. I ate two, then wrapped and froze the rest individually. For this recipe, I placed the brownie pan in a cookie sheet to catch any grease... the pan consists of three parts and the bottom part has a big square opening that is covered by the second part. While the brownie batter didn’t leak through, I knew the grease would.


******


My other blog is CORNING NY STEP BY STEP -- a view of the city where I live.)

CORNING NY STEP BY STEP is now on Facebook. LIKE it and you’ll see when I post a new entry to that blog, plus there will be extra photos of people, places and things of Corning that didn’t make it into the blog.

Tuesday, August 27, 2013

The Simplest Butternut Squash Soup

In the mid-1990s I worked in a small cafe. In addition to the regular lunch menu, each day we created two quiches, two special entrees and a soup. My favorite soup? Butternut Squash. Not only did it taste like winter and comfort and satisfaction, but also it was the simplest soup recipe I ever made.


1. Wash the unpeeled butternut squash. Cut it into large chunks.


2. Place the chunks in a large pot and cover with water. Bring to a boil; lower heat, cover and cook until can be easily pierced with a fork.


3. Remove pot from heat. Remove squash with a slotted spoon and allow to cool slightly. (DO NOT THROW AWAY COOKING WATER)


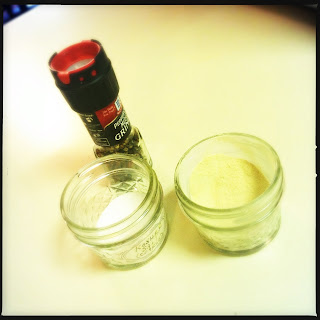
4. Scoop cooked squash out of skin and place in blender with a cup of the cooking water. Add salt, pepper and garlic powder. Don’t go crazy here--you’ll be tasting and maybe adding more later.


5. Blend, adding more water a little bit at a time till the soup reaches the desired consistency.


6. Return to pot and heat slightly over low heat. Taste and add more salt, pepper or garlic powder, if desired.


Does anyone know of a simpler soup than this BUTTERNUT SQUASH SOUP?


******


RAINBOW CUPCAKES


******


My other blog is CORNING NY STEP BY STEP -- a view of the city where I live.)

CORNING NY STEP BY STEP is now on Facebook. LIKE it and you’ll see when I post a new entry to that blog, plus there will be extra photos of people, places and things of Corning that didn’t make it into the blog.