Showing posts with label pie crust. Show all posts

Wednesday, April 24, 2013

The Perfect Pie Crust For A Strawberry Heart Pie


I may have missed out in the past, but nevermore! This is THE pie crust recipe. Absolutely spot-on perfect ~ tender and flaky! And the simple strawberry filling... delicious! Just right especially for spring when strawberries are ready for picking and if you don’t pick your own, the stores have them at the best prices of the year.

Ree Drummond who writes The Pioneer Woman blog, received the PERFECT PIE CRUST from one of her readers, Sylvia L, who admits that this recipe has been around for a long, long time and she can’t remember where she originally got it. I know I’ve seen this recipe, or a variation of it, in past years, but I never tried it because I was turned off by the idea of adding vinegar and an egg. (My pie crust typically consists of flour, salt, butter and water.)


You won’t believe my first experience making this crust yesterday when I wanted something other than the store-bought crusts suggested in Miss Buttercup’s STRAWBERRY HEART PIE.

Because my hands are slightly arthritic, I now use a Kitchen Aid mixer and Hamilton Beach food processor for many of my cooking projects, such as bread and pie making.

So, I chose to mix my pie crust with the HB food processor. Let me make it clear that I’m an old-time pie maker--keep every ingredient cold, as little handling of the dough with (warm) hands as possible and work quickly.

As you will see when you look at the recipe, there is little opportunity to keep the pie dough cold during the mixing process, unless you count the addition of the cold water. I’m used to using cold, hard butter and water kept cold by adding ice cubes.

You’ll find the recipe with detailed instructions at The Pioneer Woman. Meantime, I’m going to give you a play by play of my experiences and hints for successful preparation of the PERFECT PIE CRUST...


1. Step One is to mix the Crisco vegetable shortening and flour. Here’s where it seemed to go wrong for me. A few pulses with the food processor should have given me a mixture resembling “a coarse meal”. Instead, the dough looked like a huge ball of glue and I couldn’t imagine adding any more liquids.

2. I persevered, using a few more quick pulses to stir in the beaten egg, cold water, vinegar and salt. Glue, even more gooey.

3. Removing the mixture from the food processor revealed that the dough wasn’t quite as gooey as it had appeared, but still way softer than any pie dough I’d ever prepared.


4. I used digital kitchen scales to measure out three equal portions. All three “discs” went into plastic bags, one being labeled and frozen. The other two were refrigerated because it would be several hours before I needed them.


5. Don’t be afraid to use enough flour to keep things from sticking, ‘cause this is a much stickier dough than most.

6. I don’t recommend rolling flattened dough around the rolling pin to transfer it to the pie pan. Mine stuck to itself and I had to start over. Decidedly annoying.

7. Bottom crust in pan, covered with plastic wrap. Refrigerate again, while cutting out hearts. Meantime, the filling is made and cooling to at least room temperature.

8. See No. 4 below about cutting out hearts.

As for Miss Buttercup’s STRAWBERRY HEART PIE, the recipe is pretty straight forward...

1. For my 9” pie, I chose to use four cups of strawberries (measured after cutting into chunks). Next time I’ll use at least five. If I use a 10” pan, I’ll use six cups, and don’t worry, the pie crust will work for this larger size, too.


2. Out of my four heart cookie cutters, I chose the next to the smallest, trying to match what’s in Miss Buttercup’s picture. She probably used the smallest one. She has more patience than me.


3. The recipe calls for one egg yolk for an egg wash that was applied to both sides of each heart. I used the whole egg and had more than enough to complete that task.

4. Whether you freeze or simply refrigerate your dough to chill it (a MUST!), I suggest taking only one-third or one-half the disc out of the frig at a time when making the hearts. When this dough warms, it’s not easy to handle the hearts without destroying them.


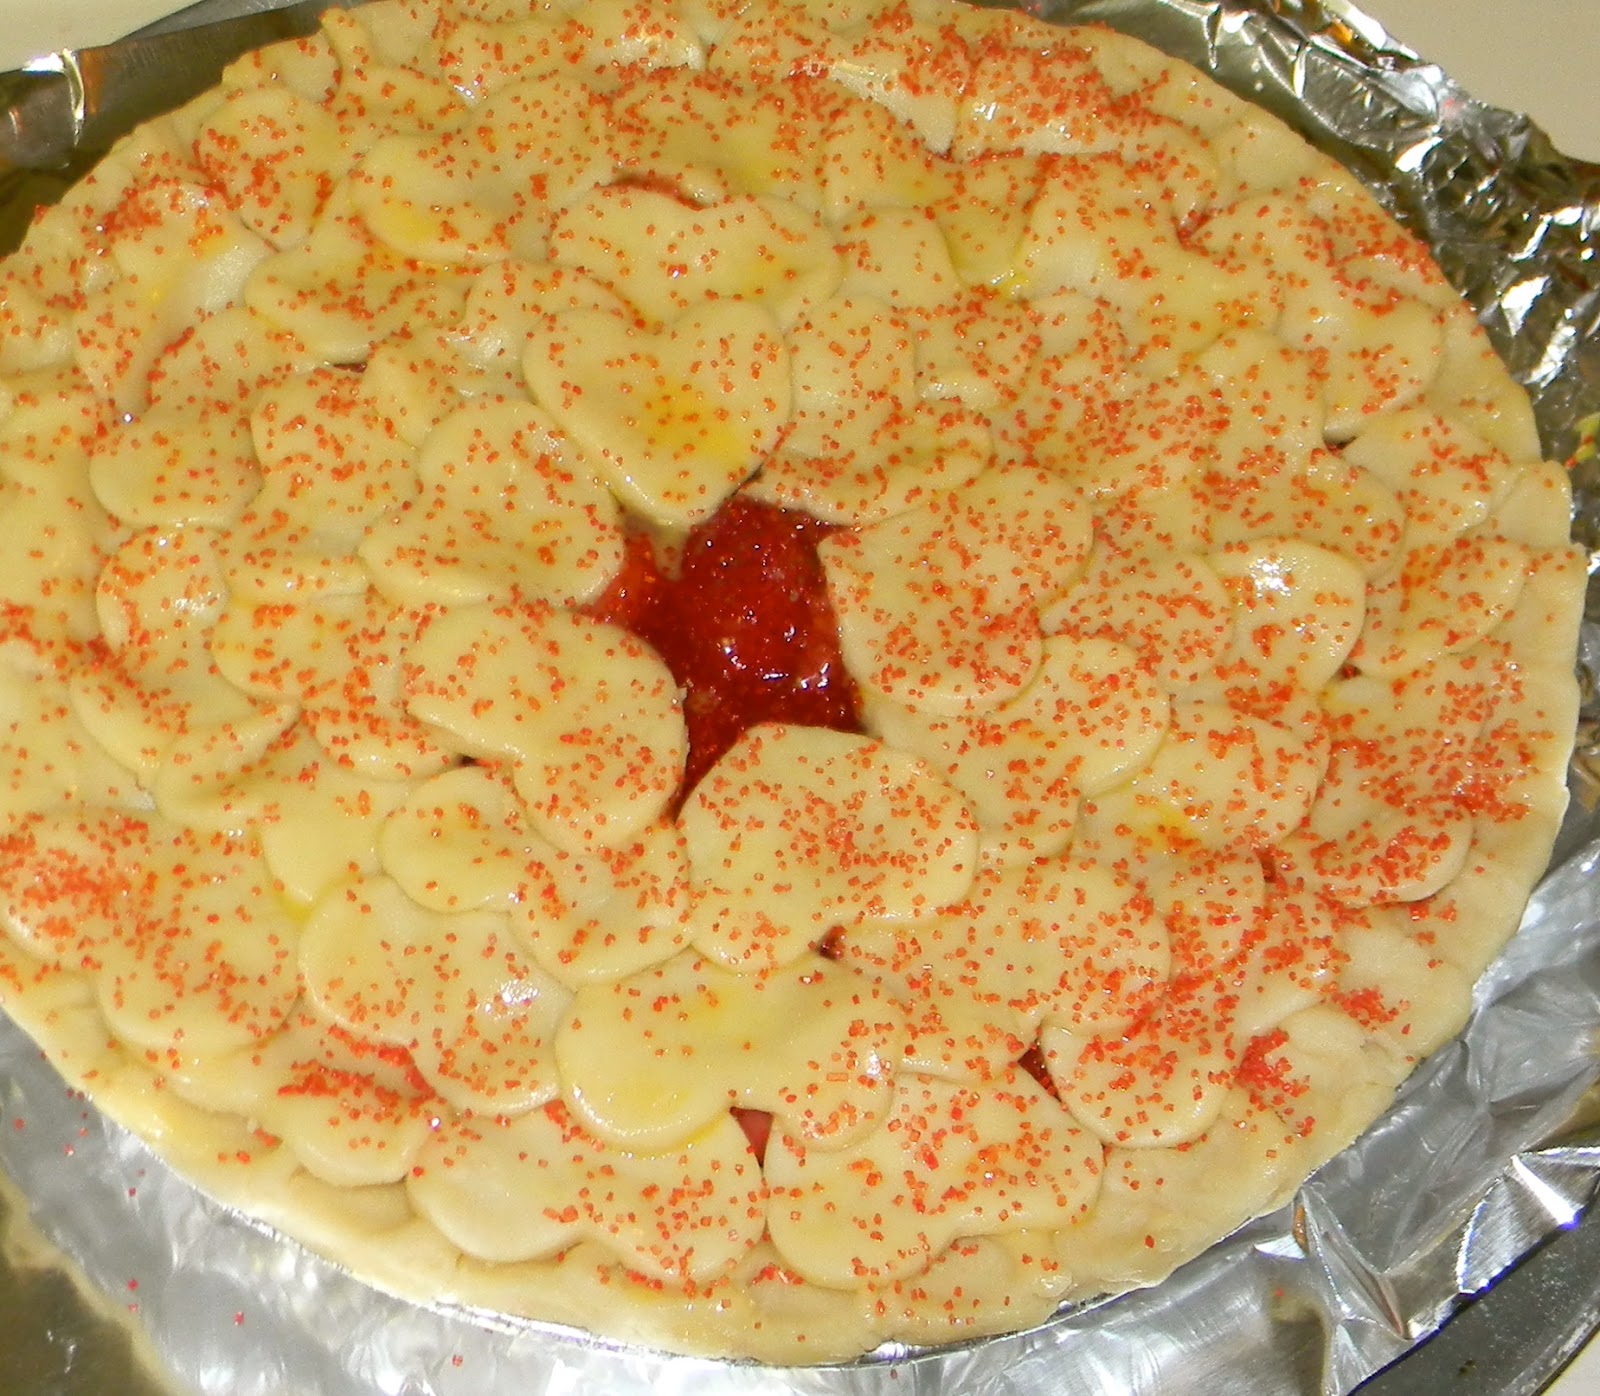
5. About the sanding sugar: I had colored decorating sugar (which is slightly larger grains than regular granulated sugar) and thought it would be pretty to use the red. It is pretty, but I probably won’t use a colored sugar again because it distracts (or is it detracts?!) from the heart shapes.

So, there you have it. An absolutely beautiful, tasty PERFECT PIE CRUST and a STRAWBERRY HEART PIE. This recipe is definitely a keeper and I can’t imagine ever using another pie crust recipe.


************


TV TRAY

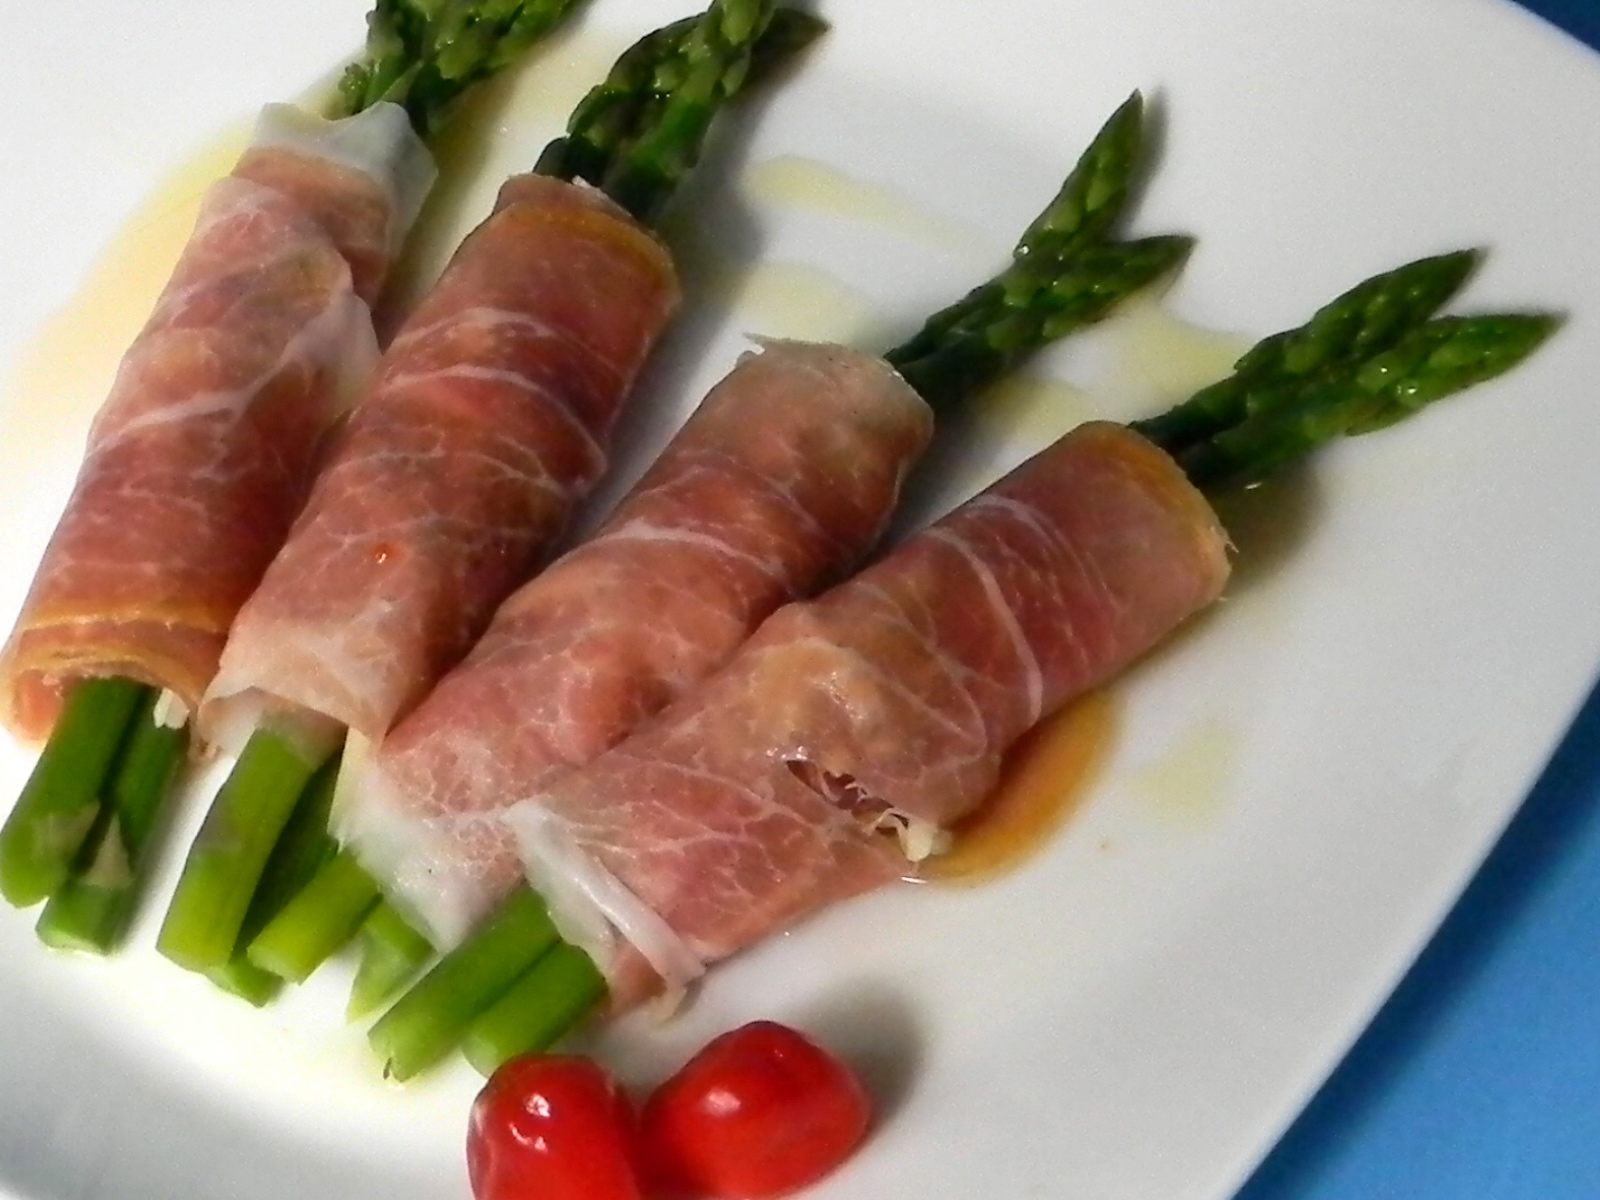
As a single person, I sometimes (often?) take my meal to the living room and eat off a TV tray while watching a movie or documentary. TV tray meals are usually cobbled-together with whatever happens to be in the kitchen, no measurements recorded.

Proscuitto-wrapped asparagus, mild gruyere, basil & freshly ground black pepper; drizzled with EVOO. Pepperdews (tastes like a slightly sweet pickle at first bite, then a spicier bite kicks in).

Friday, November 2, 2012

A Simple Supper of Panko-coated Salmon, Yams and Creamed Corn

We’re back from our Maryland vacation, and it’s so good to be in my own kitchen again where I know what everyday items I have and exactly where each is located.

My son’s kitchen is lovely and ultra-modern. But, you know those all-important items we always have on hand in our kitchens? His supply is so-o limited that I couldn’t build up the enthusiasm to do much cooking.

In a way that was fun, because we got to eat out so much. You know all about that if you read my post a few days ago: Vacation Time! Eating Out! Nando’s Peri-Peri, Wegmans, Roundz!

So, one of the first things I did when I got back Sunday night (after prepping for the possible effects of Hurricane Sandy) was to take a six ounce salmon fillet out of the freezer to thaw for Monday dinner.

I always have salmon fillets in the freezer. We do need our fish, after all, at least once or twice a week. Salmon is my favorite and so simple to prepare.

When Monday evening rolled around, the salmon was thawed. On the counter was one lonely yam and several small cans of vegetables (also in case of H. Sandy!). I opted for the creamed corn which I love but rarely eat.

Salmon, yams and corn. That has to be healthy, right? Basically it is, I guess, but my way of prepping this time probably greatly altered the healthy vs. unhealthy ratio.

The Yam ~ Wash and peel the yam. Cut extra thin slices with a sharp knife OR cut slices with a vegetable peeler. (I tried both ways and the vegetable peeler definitely produces the thinnest slices.) Heat several tablespoons of vegetable oil over medium high heat. Add yam slices and cook quickly. Adjust heat as needed. These should only take a few minutes; test with a fork. Remove to plate lined with several paper towels to drain off the excess oil.

The Salmon ~ Pat the fillet dry with paper towels and cut it into smaller pieces. Mix Panko crumbs with Kosher salt and lemon pepper. Coat the salmon pieces with the crumb mixture. (If you prepare the salmon before cooking the yams, you can cook it in the same pan immediately after you finished cooking the yams.) Cook over medium high heat, turning once or twice until just slightly pink inside. The salmon will retain some heat and finish cooking after you remove it from the pan.

The Creamed Corn ~ Heat on stove or in microwave. Dish up and sprinkle with fresh or dried parsley. (Creamed corn is very salty, so no need to add more.)


******


Thanksgiving Pies


Wednesday, November 23, 2011

PIE CRUST PREP ~ Part 2


My previous entry went through the steps leading up to forming uncooked pie dough in disc shapes, wrapping them in plastic and aluminum foil, and then freezing them for Thanksgiving and Christmas.

Today, the day before Thanksgiving, I pulled out two discs to make pie shells for pumpkin pie. I actually let them thaw in the refrigerator all night, then removed them from the frig about twenty minutes before I used them. One thing I now know, having made the pies, is that the dough would have rolled better if I’d added maybe another teaspoon or two of water. They didn’t roll quite as thin as I would have liked, but having tasted it cooked -- a small piece broke off -- I can tell it’s going to be flaky and yummy.


You can see in the photo above, and in the next three photos, that there are tiny bits of shortening and bigger pieces of butter throughout the disc. That’s what makes the pie crust flaky.

I used my Wilton Roll & Cut Mat and love that it has circles on it going out inch by inch. I usually turn my pan pan upside down then add 2-3 inches to the measurement and that’s the diameter for my dough circle.


After sprinkling flour on the mat, the rolling pin and the disc, I roll the dough beyond the circle size I want, then trim it off. Believe me when I say, these circles never roll out to a perfect configuration (Does this word work here? I like the sound of it.). After carefully loosening the circle with a spatula, the choices are to fold it into quarters or roll it around the rolling pin.


It easy to see in this picture that the dough could have been thinner. I stopped at that thickness because it didn’t want to hold together if I pressed it any further. By the way, rolling dough calls for light pressure. Don’t lean into it.

To make repairs in the uncooked pastry dough, rub a tiny bit of cold water on the part of the pie to which you are going to add a "patch".

After placing the rolled out pastry in a pie pan, gently manipulate it to fit. Don’t stretch it. Trim it off to 1/4 to 1/2 inch overhang. Tuck under the excess. Gently press down around the edge with index fingers.


Now that the pastry is ready, cover it with plastic wrap and place the pan back in the refrigerator while you prepare the filling. Follow baking directions according to whatever pie you are making.

If you have any leftover dough, leave it in whatever shape it is when you cut it off the circle. Sprinkle with cinnamon sugar and bake on a cookie sheet in the oven till nicely browned. My mother used to do this. I don't remember any of her pies, but I do remember the pieces of pastry sprinkle and baked with cinnamon sugar. It's been a while since I've done this myself, but I think it will take about 10-15 minutes. Remember, sprinkle the cinnamon sugar on the dough before you put it on the cookie sheet. Otherwise, it will probably burn onto the pan and you'll have a mess to scrub off.


My pies are Pumpkins and Chocolate Pumpkin.

Happy Thanksgiving!


******

Step by Step in the Kitchen is now on Facebook. Take a look and "Like" the page. I'll be posting extra notes and photos there.

and

Visit my other blog ~ Corning NY Step by Step, a pictorial view of the City of Corning NY.

Monday, November 21, 2011

HOLIDAY PIE CRUST PREP


I’m baking pies for Thanksgiving dinner at my daughter’s house. Another opportunity to use my Kitchen Aid stand mixer. This machine does big loads, so I tripled the recipe, using the ingredients and amounts listed in the Kitchen Aid book. The ingredients are what I’ve always used in pie crusts: flour, salt, shortening, butter and water. Sometimes I’ve used only shortening; other times only butter.

What I’m blogging about today is just the preparation of the pie pastry. Rolling out the pastry and assembling the pies will come later... maybe. Depends on how busy I get, and on what the crusts look like when I start rolling them out. Maybe I’ll take photos even if the pastry looks terrible after being rolled out. The nice thing about pie crusts is that most it is hidden and if not, can be easily patched and prettied.


Pie pastry, ingredients for two crusts...
2-1/4 cups all purpose flour
3/4 teaspoon salt
1/2 cup shortening, well chilled
2 tablespoons butter, well chilled
5-6 tablespoons ice water

Pie pastry, ingredients for six crusts...
6-3/4 cups all purpose flour
2-1/4 teaspoons salt
1-1/2 cups shortening, well chilled
6 tablespoons butter, well chilled
15-18 tablespoons ice water


Directions...
1. Measure flour and salt into large mixing bowl; whisk together. Cover and refrigerate.
2. Measure shortening; cover and refrigerate.
3. Measure butter; cut in small pieces and refrigerate.
4. Measure ice water and refrigerate.
5. Check refrigerated shortening after several hours (or let sit in refrigerator overnight). When hard enough, cut into small pieces. Place back in frig for at least one more hour.
6. Add cut-up shortening and butter to flour/salt mix. Combine quickly till shortening is size of small peas.
7. Add water 1 tablespoon at a time until pastry is moistened and dough begins to hold together.
8. Using your hands, quickly shape the dough so that it can be cut into equal amounts.


9. Pat each piece into a flat disc, wrap it in plastic wrap, then foil. (Keep pastry covered with a damp paper towel, taking out enough for one disc at a time.)


10. If using the same day, or the next, refrigerate. At this time, too, the packages can be placed in the freezer until you’re ready to use them.


Notice the references to “chill” and “refrigerate” throughout this piece? That’s because it’s important to keep the ingredients cold, before and after assembling them. That’s also why you have to work quickly.

I used my Kitchen Aid mixer and it worked so much better for the larger quantity of ingredients. Optional methods of mixing are to use a pastry blender or a couple of knives (works well with smaller amounts of pastry dough).

Six pastry discs are ready and chilling in my freezer. Three or four will go into this week’s baking and the rest will await my pleasure. Maybe Christmas pies?


******

Step by Step in the Kitchen is now on Facebook. Take a look and "Like" the page. I'll be posting extra notes and photos there.

and

Visit my other blog ~ Corning NY Step by Step, a pictorial view of the City of Corning NY.