Showing posts with label walnuts. Show all posts

Thursday, February 14, 2013

Roasted Butternut Squash


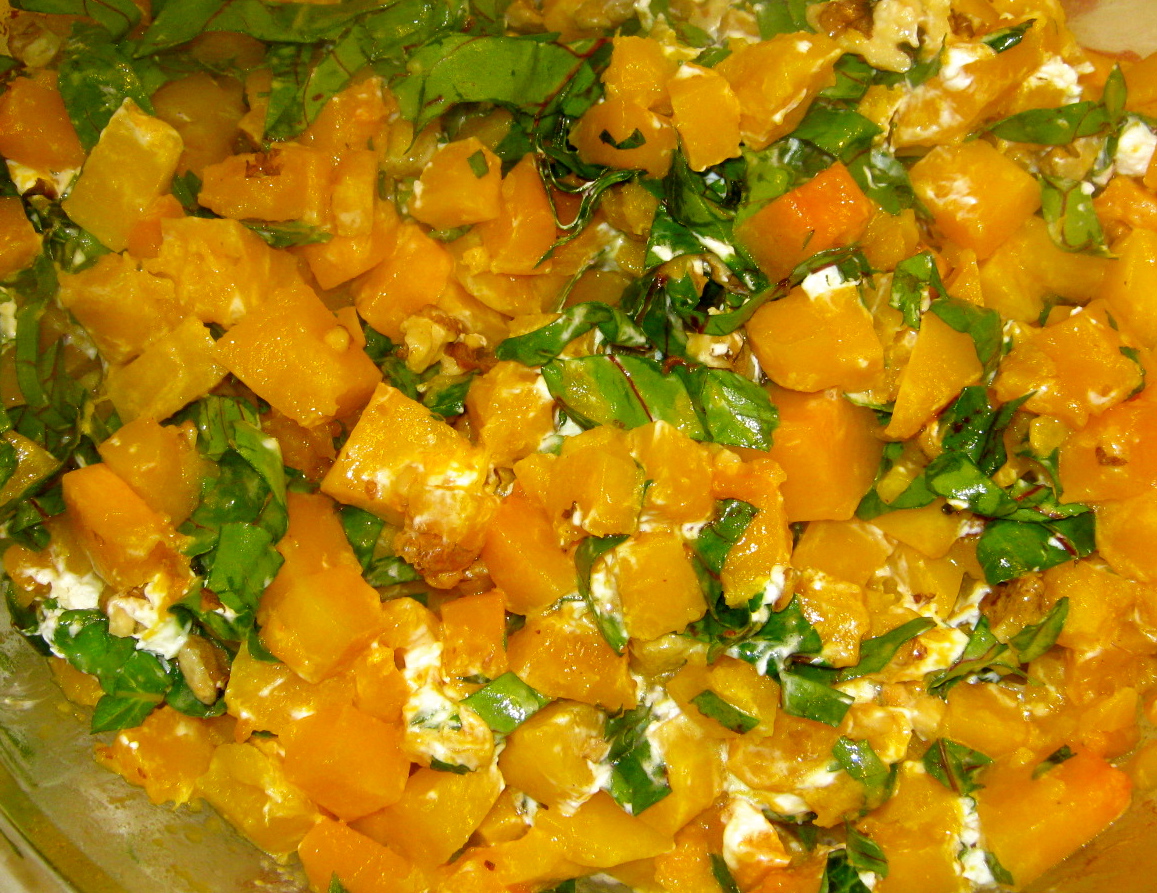
My new favorite butternut squash recipe! In fact, this healthful squash/beet green/walnut/mint/goat cheese creation is so outstanding that the first time I made it, I started eating it right from the mixing bowl -- and, I completely forgot to click one of those photos showing a prettily-plated individual serving.


This recipe which I found in the December 12, 2011 issue of Woman’s World magazine, was created by Food Network Star finalist Chef Colombe Jacobsen.

Best in the fall when the butternut squash and beet greens can come straight from your garden or a farmers’ market, this recipe looks good on any table, any time of year. This Roasted Butternut Squash is so beyond just cutting up a couple of squash and sticking them in the oven coated with oil and seasonings.


Ingredients...

4 small butternut squash, 6-8 pounds (the smaller the better, when it comes to peeling)
2 tablespoons EVOO (extra-virgin olive oil)
1-1/2 teaspoons kosher salt (or other coarse salt) - split
3 cups beet greens
3/4-cup roughly chopped walnuts
1/4-cup roughly chopped fresh mint leaves
1 cup crumbled goat cheese (5 ounces)
1/4-teaspoon freshly ground black pepper


Directions...

1. Preheat oven to 425-degrees Fahrenheit.

2. Peel and seed squash. Cut into 1/2-inch cubes.

3. Place on two baking sheets; drizzle with oil and season with 1 teaspoon salt. Gently toss to coat evenly and leave in single layer.

4. Bake squash until softened and golden, 20-25 minutes.

5. Stem and slice washed and dried beet greens.

6. Toast walnuts in skillet over medium heat, stirring, until fragrant, 5-7 minutes.

7. In large bowl, toss squash, beet greens, mint and goat cheese (I chose Chevrai Soft Unripened Goat Cheese Crumbles).

8. Add pepper and remaining 1/2-teaspoon salt. Toss, top with toasted walnuts, and serve warm


Monday, January 28, 2013

Pear-Cranberry Pie


Yes, I’m enamored with cranberries and you will be, too, after you taste this Pear-Cranberry Pie. The sour flavor of the craberries combines beautifully with whatever sweetener you choose. And the color! Who can resist the bright, shiny reds of cranberries. No need to buy canned cranberries or canned cranberry sauce. It’s so easy to cook your own, starting with raw cranberries that can easily be stockpiled in your freezer.

Have you noticed the spot in the right-hand column that says “Looking for a recipe using a certain ingredient? Look here... ?” Well, type in ‘cranberry’ or ‘cranberries’ and you’ll find that Step by Step in the Kitchen already features several recipes using cranberries. Here’s one more to use up those cranberries in your freezer.

PEAR-CRANBERRY PIE
(serves 6-8)


Ingredients...

1/2-cup sugar
11 ounces frozen cranberries
3 tablespoons cornstarch
1/4-cup water
18 ounces Bosc pears
Juice from 1/2 lemon
1 tablespoon white granulated sugar
1-1/2 teaspoons cinnamon powder
1/2-cup chopped walnuts
2 tablespoons butter
double pie crust

Directions...
1. In a 2-quart saucepan, combine sugar, cranberries, cornstarch and water. Bring to a boil over medium heat, stirring constantly. Lower heat if necessary. Stir gently. Boil one minute or until thickened. Set aside to cool.

2. Wash, peel, core and slice pears. Stir in lemon juice. Cover and set aside. Can be refrigerated.

3. Prepare your pie crust. Using a cookie cutter or some other method, cut small designs in the top crust. Or, cut several slits in the top crust after the pie is assembled.

4. Spread thickened cranberry mixture in pie pan on top of bottom crust.

5. Arrange pears on top of cranberry mixture.

6. Sprinkle sugar-cinnamon mixture on top of pears and then sprinkle with walnuts.

7. Divide butter into eight pieces and place on top of pie.

8. Add and attach top crust. Place pie plate on a baking sheet covered with aluminum foil, in case of spillover. Tear off four strips of foil and attach to each other, end to end. Use to cover outer edge of pie crust.

9. Bake in preheated 450-degree Fahrenheit oven for 10 minutes. Lower heat to 350-degrees and bake 30 minutes more. Remove foil and bake approximately 30 minutes more until golden brown and the filling can be seen bubbling through the openings in the top crust.

I chose Bosc Pears for this pie. Brought them home from the supermarket and let them sit on the counter for several days to ripen. At that point, they were just as firm as when I bought them. Peeled, they are lovely with no blemishes. A melon-baller came in handy for removing the core (a grapefruit spoon will work just as well). Although the Bosc Pears were just mildly sweet, I chose not to add any sweetener other than the sugar-cinnamon mixture being sprinkled on top.


I have to declare this my favorite dessert and my favorite overall next to the Scallop and Salmon with a Cranberry and Nut Sauce.


Monday, June 4, 2012

Cranberry-Walnut Chocolate Chip Cookies


Chocolate chip cookies are a classic and the recipe is always the same: flour, soda, salt, butter, sugar, brown sugar, egg and vanilla. And, of course, chocolate chips.


While most chocolate chip cookies include equal amounts of white and brown sugar, my Cranberry-Walnut Chocolate Chip Cookies are based on a recipe in Woman’s World (10/17/11) which uses more brown than white.

Plus, I like to add ingredients to cookies, so this time I chopped up some raw cranberries (I always keep a bag or two in the freezer) to add along with chopped walnuts.


Woman’s World directions say to sift the dry ingredients. As an alternative to sifters these days, many kitchens include whisks. Go for it, whisk the dry ingredients!


CRANBERRY-WALNUT CHOCOLATE CHIP COOKIES

Ingredients...

1-1/3 all-purpose white flour
1/2 teaspoon baking soda
1/2 teaspoon coarse or kosher salt
1/2 cup unsalted butter, softened
1/3 cup white, granulated sugar
1/2 cup packed brown sugar
1 egg
3/4 teaspoon pure vanilla extract
1 cup (6 ounces) bittersweet chocolate chips or chunks (substitute semi-sweet, if preferred)
1/2 c. raw cranberries, chopped
1/4 cup chopped walnuts (or other nut, if preferred)


Directions...

1. Preheat oven to 350-degrees Fahrenheit. Line baking sheets with parchment paper.
2. Sift or whisk together flour, baking soda and salt.
3. In another bowl, beat (medium speed) butter and both sugars until light and fluffy (about 2 minutes)
4. Beat egg and vanilla into sugar mixture.
5. Add flour mixture to sugar mixture. Beat on low just until blended.
6. Stir in chips, cranberries and nuts.
7. Drop tablespoon-size balls of dough 2-inches apart on baking sheets.
8. Bake 5 minutes then rotate pans.
9. Bake 8-10 minutes until edges are lightly golden.
10. Cool on pans on racks for 2 minutes.
11. Transfer to racks; cool completely

I realize these photos are a little dark, but here they are, the finished product-- Cranberry-Walnut Chocolate Chip Cookies. Every bite is a treat!


******

Now... you remember my last post where you got a glimpse of my kitchen cupboards?

Last night, when I was finishing up washing dishes and straightening up the kitchen, I decided to take photos of my kitchen, particularly the counters so you can see how organized I am (not).

The thing is, it’s the way it works best for me in that itty-bitty kitchen.

I am the only dishwasher. The plastic bag is washed and drying, held to a cupboard door handle by clothespin. I pin up my rubber dishwashing gloves the same way to air dry them. That’s a plant-growing light on the back wall. I put it there so I can better see the dishes I am washing.


To the left of the stove is a catch-all corner. An electric kettle to heat water for my tea. A used tea tin to store homemade hot chocolate mix (with marshmallows!).


On the opposite side there is a see-through to my diningroom. A microwave with what used to be a mess on top now safely stored in a green basket. See the clothespin on the Kitchen Aid cover? That holds cooking notes or recipes when I need them. Beside it is a whiteboard with more cooking/cleaning notes. A glass of parsley from my garden. My exercise sheets and meds are on the counter as are my datebook and notes about what I’m to do the each day.


*******

LIKE Step by Step in the Kitchen on Facebook. I'll be posting extra notes and photos there.