Showing posts with label tomato. Show all posts

Wednesday, May 29, 2013

Coconut Salmon ~ Mmm, Mmm, good!


I had an urge to make pudding last night. What to use? A bit of brown rice in the cupboard and part of a huge can of coconut milk! That’ll do the trick. But, what to do with the leftover coconut milk?

Salmon thawing in the frig for supper and why wouldn’t coconut milk fit the bill? Think tropics -- hand-caught fish and coconuts falling off tall trees. Well, enough of that talk. After all I’m in the middle of New York State. The nearest coconut tree I know of is at the Smithsonian Mall -- in the Conservatory of the U.S. Botanic Gardens -- in Washington DC, five hours to the south.

A basic pan-seared salmon fillet is my favorite. A couple of tablespoons of flour, salt & pepper. Warm the pan over medium heat and add a tablespoon of olive oil and one of butter. Dredge the salmon fillet in the flour mixture and shake off the excess.

As soon as the bottom is browned and the fish looks cooked just 1/8-1/4 inch up, turn the fish with tongs. Cook for another 3-5 minutes then start spooning on coconut milk. The milk will sizzle away when it drizzles down onto the pan. Keep spooning for a minute or two.

Turn off the heat under the pan and place the fillet on a plate. Cover the fish with a “tent” of aluminum foil tucked tightly around the edges of the plate.


Stir a few more spoonfuls of coconut milk into the pan.

After a minute or two, remove the foil tent and spoon the extra sauce onto the salmon.

I completed my meal with a mixture of mesclun (baby field greens) and arugula from my garden, topped with EVOO and red wine vinegar.


TV TRAY


As a single person, I sometimes often take my meal to the living room and eat off a TV tray while watching a movie or documentary. TV tray meals are usually carefully prepared thrown together with whatever happens to be in the kitchen, no measurements recorded.

Tortillas, ham, sour cream, chives, cream cheese, tomato, provolone cheese; broccoli


(Last but not least, I hope you'll take a few minutes to visit my other blog, CORNING NY STEP BY STEP -- a view of the city where I live.)


Saturday, September 15, 2012

TWO Triple-Decker Toasted Cheese, Tomato and Herb Sandwiches

So few tomato plants, yet so many tomatoes. I’m overwhelmed with tomatoes. Even knowing that I’m competing with a greedy squirrel (or could it be the skunk I smell several nights each week), there seems to be a plethora of tomatoes in my little garden.

I made a tomato vegetable pie and I’ve given some tomatoes away, but still I pick tomatoes. Because of the previously-mentioned creature, the moment I see as much as a glimpse of color other than green, I pick a tomato and place it on the windowsill.


Thank heavens, the supply is finally winding down. But, this past week the sill was getting crowded, so I decided to have a simple sandwich supper, two nights in a row.

Thus was born TWO TRIPLE-DECKER TOASTED CHEESE, TOMATO AND HERB SANDWICHES!


Ingredients for four sandwiches...

12 slices whole grain bread
butter and/or extra virgin olive oil

Sandwich #1 ~
4 oz. cream cheese (half an 8-oz. box)
grated cheddar cheese (I grated sharp white cheddar)
fresh tomato slices, enough to cover 8 slices of bread
fresh basil leaves, cut in thin strips
fresh sage leaves, cut in thin strips
freshly ground black pepper
raw, shredded carrots


Sandwich #2 ~
4 oz. cream cheese (half an 8-oz. box)
shredded cheddar cheese (I bought this yellow cheddar already shredded)
fresh tomato slices, enough to cover 8 slices of bread
fresh basil leaves, cut in thin strips
fresh sage leaves, cut in thin strips
freshly ground black pepper
raw, shredded carrots
small cooking onion, cut in thin strips


Directions...

1. To prepare tomatoes: slice tomatoes, place on plate and sprinkle with basil strips and freshly ground black pepper. Loosely cover and set aside.

2. To prepare cheddar cheese: grate cheese, cut fresh sage leaves in strips, mix in small bowl. Loosely cover and set aside.

3. Spread a thin layer of butter on both sides of all twelve (12) slices of bread (or brush with EVOO). Note: I used butter for the first night and brushed EVOO on my slices of bread on the second night. No noticeable difference, as far as I'm concerned.

4. For each sandwich, over medium heat, brown both sides of one slice of buttered bread and brown only one side each of the two remaining slices. You can brown all the slices as directed before assembling the sandwiches.

5. For Sandwich #2, add the step of lightly sauteing the carrots and the onions.

6. Assemble in this order: bread (untoasted side down) topped with cream cheese, tomatoes and basil; bread toasted on both sides; cheddar cheese and sage; carrots (and onions if making Sandwich #2); bread (untoasted side up).

7. Place in heated pan, over medium heat (adjust as needed), topping each sandwiches with a lid or weighted plate. Turn when bottom side is browned. Brown second side to desired doneness.


These vegetables, cheeses and herbs were used according to what was available in my garden and my refrigerator. Take a look at what you’re growing or what’s in your fridge and you can create your own delicious sandwich.

Aha, I just remembered... if you look closely at the layout of ingredients with the yellow cheddar, you’ll see that I mixed in a few sliced almonds. A crunchy bonus!

Sunday, September 2, 2012

Vegetable Pie Made with Colorful Homegrown Tomatoes

A lip-smacking veggie pie that even your meateaters will be crazy about!

Now that my tomatoes are starting to ripen and it’s become a race to use them before they over-do, Veggie Pie keeps popping into my mind! And BASIL. The original recipe calls for 1 tsp. (dried) basil. Since I have a gardenful (exaggerate!) of basil, I could use that (3 x dried amount). OMG, dried is nothing like fresh.


So, let’s get to it and start using up tomatoes and basil. If you have broccoli or onion in your garden, grab some of those, too.


The best part in making this pie is that the filling ingredients don’t need any mixing. Just layer them in the order they are listed.


VEGGIE PIE MADE WITH COLORFUL HOMEGROWN TOMATOES
(Vegetable Pie from Whole Foods for the Whole Family with my slight changes)

Ingredients...


Crust:
1/2 c. butter (cold!)
1-1/4 c. whole wheat flour
2 tsp. baking powder
1/2 tsp. salt
1/2 c. plain yogurt (I used Oikos Greek Yogurt - my favorite)


Filling:
2 c. finely chopped broccoli (I’ve made it with fresh, but usually thaw a 10 oz. box of frozen chopped broccoli and use that)
1/3 c. diced onion (from my freezer)
1 c. grated cheese (my choice this time was 1/2 c. each shredded cheddar and mozzarella)
2 medium tomatoes, sliced (enough to cover the top)
1/3 c. mayonnaise (I used Light)
1 tsp. basil (I tore up 5-6 medium to large basil leaves)


Directions...

1. Cut butter into flour, baking powder and salt. (I mixed it in a food processor.)

2. Add yogurt and mix.

3. Grease or butter a 9- or 10-inch pie pan. (I greased a 9.5-inch deep-dish, glass pie pan).


4. Pat dough into pie pan.

5. Layer filling over crust in order given.

6. Bake at 450-degrees Fahrenheit for 10 minutes, then at 350-degrees F for 30 minutes. (Because I used a glass pan, I baked it at 425 for 15 minutes, then lowered the temperature to 325 and baked it 35-40 minutes more.)


I first tested this recipe from La Lache League’s Whole Foods for the Whole Family in April 1990 and have made it numerous times since ‘cause I can’t stop lovin’ it!


******


Also from Whole Foods for the Whole Family, another finger-licking good recipe I’ve made throughout the years ~ Fantastic Carob Fudge.

Thursday, February 16, 2012

Santa Fe Salmon and an award


Before I tell you about this yummy fish dish, I have to say thank you to Bobbi Marshall at Bam’s Kitchen for nominating me for a Reader Appreciation Award. Bobbi currently lives in Asia and her blog features “unique international dishes that even teenagers will enjoy”.

According to Bobbi, the rules of this award are to:
. Award your top (up to 6) bloggers who have commented the most.
. Be thankful.
. You cannot award someone who has already been awarded and you cannot give the award back to me.
. Don’t forget to tell the bloggers you’ve awarded.
. If you don’t want to pass on this award, just admire it.

I’m nominating four fellow food bloggers. I don’t think they’ve been nominated before, but even if they have, they deserve it again. Super bloggers! Check them out and let them know I sent you.


1 ~ Choc Chip Uru from Go Bake Yourself. Choc Chip Uru is a favorite not just because she bakes, or just because she specializes in chocolate, but also because she has a wonderful way with words. CCU is an Australian high school student and will awe you, I’m sure, as much as she does me.

2 ~ Anna and Chelsea from Hidden Ponies. Sisters Anna and Chelsea share recipes, including lots of sweets and bits of their family life with their readers. They often invite other family members, just as talented with food and writing, to guest post on their blog.

3 ~ Jay from Tasty Appetite. If you appreciate foods from India, like I do, you look forward to reading Jay’s blog and trying out her many recipes, including lots of vegetarian offerings.

4 ~ Cory from Zesty Cook. Zesty makes the best hardy foods yet isn’t afraid to experiment as evidenced by his recent Gluten Free Oatmeal Chocolate Chip Cake with Cream Cheese Frosting.

So thanks again to Bobbi for the nomination for a Reader Appreciation Award, and now on to the recipe.

******

I absolutely love salmon. Talapia is good, so is tuna, but salmon has to be my favorite. I’ll eat it plain or doctor it up when the urge hits me. This is a very simple recipe created to use up the Philadelphia Santa Fe Blend Cooking Crème in my refrigerator. Just a few ingredients and a few steps take this dish to a higher state of deliciousness.

SANTA FE SALMON
(Serves 2 ~ multiply ingredients to serve more according to your needs)

Ingredients...


1 tablespoon Extra-Virgin Olive Oil
6 ounces Salmon, cut into bite-size pieces
1/2 lemon
1/4-pound Brussels sprouts (cleaned, ends cut off and each Brussels sprout cut in half)
2 Roma (plum) tomatoes, each cut in 3-4 wedges
Dried basil
Philly Cooking Crème, Santa Fe Blend


Directions...

1. Heat EVOO in saucepan large enough to accommodate all ingredients.
2. Arrange salmon, Brussels sprouts and tomatoes in pan and drizzle all with lemon juice. Toss lemon in pan, too.
3. Sprinkle tomatoes with dried basil

4. Cover and cook 4-5 minutes over medium-low heat.
5. Remove salmon and set aside. Continue cooking vegetables 4-5 more minutes until Brussels sprouts are easily pierced with a fork or sharp knife.

6. Remove lid, return salmon to pan and stir in 1-2 tablespoons Cooking Crème.
7. Microwave additional Cooking Crème for 15-20 seconds (while salmon and vegs stay warm in pan). Serve at table with salmon.

Tuesday, November 1, 2011

FISH STICKS, SPAGHETTI SQUASH, TOMATOES AND PEAS


My supplies of winter squashes includes two spaghetti squashes, two decorative acorn squashes and one pumpkin. I probably won't cook them all. The pumpkin is painted white and has a black spider web drawn on it. The acorn squashes are too pretty to do away with and I'd like to see them last as long as possible on my dining room table.

That leaves the acorn squash. Just over a month ago, I featured spaghetti squash topped with leftover Sloppy Jane Mix. Today I'm cooking and topping it differently.

My initial challenge, as with all of the winter variety, is that these guys are tougher than tough to cut! My method -- and you might want to try it -- is to get the knife started, then whack it with a rolling pin. I suppose a hammer would work just as effectively, but the rolling pin is already at hand in the kitchen.


CLICK AT THE SIDE OF ANY PHOTO TO SEE AN ENLARGED VERSION.


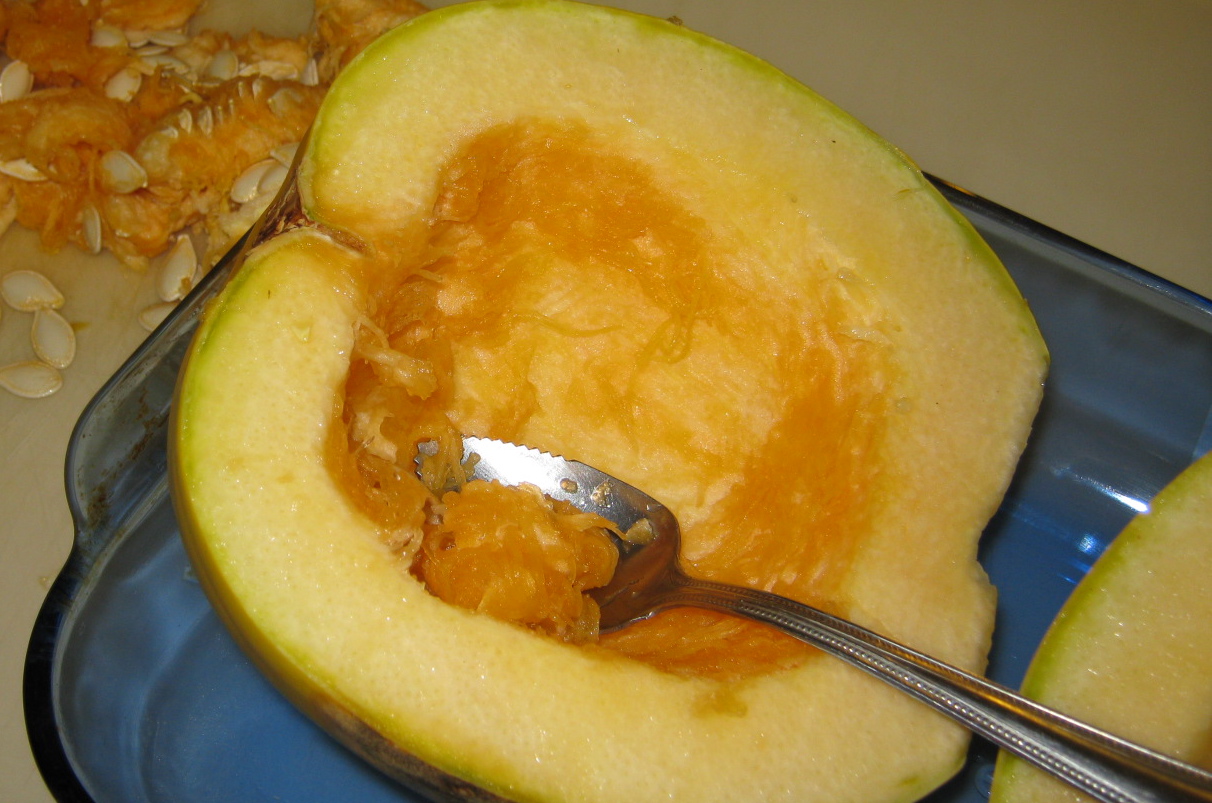
After cutting the fruit (yes, it is a fruit), I used a grapefruit spoon to scoop out the seeds and pulp. Then I placed both halves in a pan, cut side up. There is no need to add water or anything else.


After cooking in a 350-degree Fahrenheit oven for 40-50 minutes, I removed the squash from the oven and used a fork to test its doneness. That means turning the fork upside down and scraping it along the flesh. Unless under- or over-cooked, the spaghetti like strands will separate easily.


The final plating included breaded fish sticks, tomato slices (only one more left from my harvest), and peas (store-bought, frozen). I drizzled EVOO over the spaghetti squash and tomatoes, added a light touch of kosher salt and freshly ground pepper. Oh, and I sprinkled a bit of dried basil on the tomato slices.


Simple and satisfying. Leftover spaghetti squash is freezable, but better refrigerated and used up in the next few days.

******

In the coming weeks...
Indian carrot pudding, chicken stir fry, apple-raisin bars, chocolate chip-cranberry cookies, eggplant lasagna, gluten-free/dairy-free brownies, salmon with curried lemon sauce, Santa Fe salmon, tofu-apple stir fry, tofu-chicken stir-fry, coconut cake, no-bake cookies w/coconut. That's what's saved on the computer. Who knows what I'll decide to make in the meantime.

******

Step by Step in the Kitchen is now on Facebook. Take a look and "Like" the page. I'll be posting extra notes and photos there.

and

Visit my other blog ~ Corning NY Step by Step, a pictorial view of the City of Corning NY.

Sunday, September 25, 2011

SPAGHETTI SQUASH DINNER


My daughter and her family recently moved to the country and have numerous neighbors who are always willing to help and share. One neighbor grows spaghetti squash which I love, and I’m happy to say that I was gifted with one of them.

Just the right size for me to use in two meals. That may seem like big helpings, but one cup of spaghetti squash is less than 100 calories and it’s low in saturated fat and cholesterol. I also love to eat some of the strands just after it comes out of the oven.

Squash is really thick-skinned and difficult to cut. Cut off the stem end. Then cut the squash in half. However you decide to cook it -- boiled, in the oven, or in the microwave, do not bother to peel off the skin.


CLICK ON ANY PHOTO TO SEE AN ENLARGED VERSION.


I like to scoop out the seed with a serrated grapefruit spoon. A tablespoon will work just as well. I’ve heard that the squash seeds can be toasted in the oven like pumpkin seeds. If anyone has a good recipe for doing that, I hope you’ll share it here.


You’ll find numerous ideas for temperatures and times in your cookbooks or on the Internet. I only cook it once or twice each summer and it seems like I do it different (or is it, differently) every time.

While the squash was cooking, I pulled leftover Sloppy Jane mix from the refrigerator and put it in a saucepan over low heat.

Then I sliced a tomato from my garden, topped each slice with a piece of mozzarella cheese, a basil leaf (also from my garden), and topped it all with freshly ground black pepper and a very small amount of kosher salt.


You’ll know spaghetti squash is done when you can run a fork, tines down, through it from end to end (the long way) and it easily shreds out like short strands of spaghetti. Overcooking will make mush which has happened to me in the past. Oh, well, I cook and learn...


I topped the cooked Spaghetti Squash strands with the reheated Sloppy Jane mix and enjoyed it with the Tomato-Mozzarella-Basil Salad.


*****

Step by Step in the Kitchen is now on Facebook. Take a look and "Like" the page. I'll be posting extra notes and photos there.

and

Visit my other blog ~ Corning NY Step by Step, a pictorial view of the City of Corning NY.